The
term hemming has its origins in fabric making where the edge of cloth
is folded back on itself and then stitched shut. In sheet metal
hemming means to fold the metal back on itself. When working with a Brake Press hems are always created in a two step process:
- Create a bend with Acute Angle Tooling in the metal, 30° is preferable but 45° will work for some circumstances.
- Place the acute bend under a flattening bar and apply enough pressure to finish closing the bend.
The
first step is done the same as any regular acute angle bend. The
second stage of the hemming process requires some additional know how
on the part of the Brake Press operator
and tool designer because the angle of the sheet metal, the flattening
bar wants to slide down and away from the sheet metal. In addition the
work piece wants to slide out from between the bars. These two forces
are known as thrust forces.
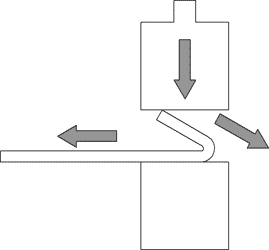
This
requires that the flattening die be designed to withstand the thrust
forces and remain flat. In addition it requires that the operator put
a forward force against the sheet metal to prevent it from sliding out
of the die. These forces are most prominent on thicker work pieces
with shorter flanges. With these factors in mind let’s examine three
of the most common forms of hemming set ups and tooling available for
press brakes.
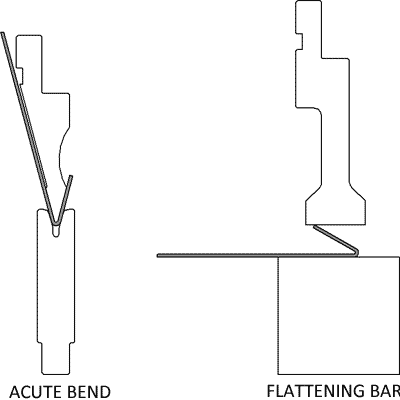
Multi Tool Setup, Acute Tooling and Flattening Die
The
simplest form of hemming set up is combining two different setups. The
first is an acute setup, where the 30° bend is created using standard
tooling. Once the first bend is made the part is either transferred to
another machine, or a new setup is put into the original. The second
setup is a simple flattening bar. The bend is placed underneath the
flattening bar and is closed. This setup doesn’t require any special
tooling and may be preferable for short runs, prototypes or job shops
which will need to form a variety of hem lengths. As individual pieces
of Brake Press Tooling the
acute tooling and flattening bar are very versatile, and add value
outside of hemming. The draw backs to this system is the obvious
requirement of two unique setups, as well there is no thrust control in
the flattening process.
Two Stage Hemming Punch and Die Combination
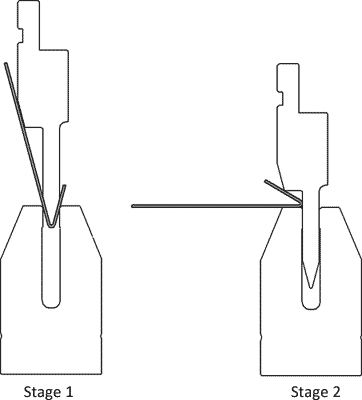
A
two stage hemming die works by using a deep channeled die and an acute
sword punch. The first bend uses the channel as a v opening to air
form the bend. In the second stage the punch slides into the channel
as the punch is closed and the edge of the punch is used to flatten the
sheet metal. Seating the punch inside the die’s channel redirects the
thrust force into the die, which can be more readily secured than the
punch itself. The drawback for this type of die is that it practically
requires a CNC control. Because of the difference in height between
the stroke of the first and second stage to adjust manually would be
very time consuming. In addition this type of die can be easily split
from over tonnage, reinforcing the need for
computer controlled safeties.
Three Stage Hemming Punch And Die
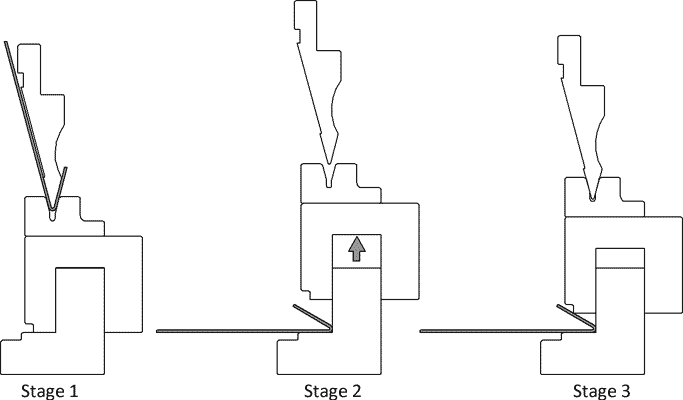
The
other most common form of tooling designed specifically for creating
hems is a three stage, or accordion type punch and die. The v opening
sits on top of a spring loaded pad, which sits over a bottom pad. In
the first stage the acute bend is created in the v opening after the
spring has been compressed and the upper pad is seated on the lower
pad. In the second stage the upper ram is retracted and the springs
between the upper and lower pad returns it to its original position.
The sheet metal is then placed between the upper and lower pad and the
punch is closed down transferring tonnage through the v die. Special
relief is given to the v die to allow this tool on tool interaction.
The guide between the upper and lower pad prevents the thrust forces
from affecting the rest of the tooling. The lower die also gives the
operator something to push the work piece against preventing the sheet
metal from sliding out. This tool is preferred for mechanical, non
CNC, brakes because the difference in stroke heights is very small,
making adjustment less time consuming. This set up also allows you to
use a standard acute punch.
Tonnage Required For Hemming
The
tonnage required for hemming is going to depend on the strength of your
material, its thickness and most importantly what type of hem you wish
to form. The tear drop and open hems do not require nearly as much
tonnage as a flat hem does. This is because you are only changing the
inside radius minimally, basically you are just continuing the bend
past 30°. When you flatten the metal you are forming a crease and
removing the inside radius. Now you are forming the metal rather than
simply bending it. Below you can see a hemming tonnage chart for cold
rolled steel.

| Metal Thickness | Open / Tear Drop Hem Tonnage | Finished Height | Closed Hem Tonnage | Finished Height |
|---|---|---|---|---|
| 24 Gauge | 15 | .118 | 35 | .048 |
| 22 Gauge | 20 | .118 | 50 | .060 |
| 20 Gauge | 25 | .137 | 60 | .072 |
| 18 Gauge | 26 | .137 | 80 | .096 |
| 16 Gauge | 38 | .181 | 95 | .120 |
| 14 Gauge | 50 | .216 | 130 | .150 |
| 12 Gauge | 90 | .255 | 180 | .21 |
| 10 Gauge | 100 | .314 | 210 | .269 |
| 8 Gauge | 140 | .445 | 280 | .329 |
Uses For Hems
Hems
are commonly used to re-enforce, hide imperfections and provide a
generally safer edge to handle. When a design calls for a safe, even
edge the added cost of material and processing of a hem is often
preferable to other edge treating processes. Designers should look
beyond a single small flat hem to treat edges. Doubling a hem can
create an edge perfectly safe to be handled without almost regard for
the initial edge quality. Adding a hem in the ‘middle’ of a bend
profile can open the doors to a variety of profiles not possible
without fasteners or welding. Even without sophisticated seaming
machines a combination of two hems can create strong, tight joints with
little or minimal fastening. Hems can even be used to strategically
double the thickness of metal in areas of a part which may require
extra support. Hems used in the food service industry should almost
always be closed for sanitary purposes (very difficult to clean inside
the opening).

Double Hem Edge – Hem And Double Metal Thickness Bend For Support – Using A Hem To Create Advanced Profiles
Determining Flat Patterns Of Hems
The
flat pattern of a hem is not calculated in the same fashion as a
typical bend. This is due to the fact that factors such as the Outside Setback and the K-Factor
become useless as the apex of the bend moves to infinity. Attempting
to calculate the allowance for a hem like this will just lead to
frustration. Instead a rule of thumb of 43% material thickness is used
when calculating the allowance. For example if our material is .0598”
and we want to achieve a 1/2” hem we will take 43% of .0598, .0257 and
add that to the 1/2” giving us 0.5257”. Thus we must leave 0.5257” on
the end of the flat pattern to achieve a 1/2” hem. It should be noted
that this rule of thumb is not 100% accurate. If you are interested in
creating a high accuracy hem you should always bend a sample piece,
measure and adjust your layouts. It’s wise to do this for your
commonly hemmed materials and create a chart for future reference. The
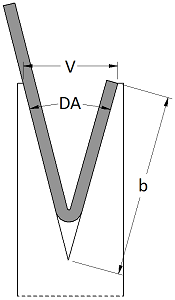
minimum size or length of a hem is going to b determined by your v
opening of your die. It is going to be wise to check your hem length
after bending because the final step of flattening the metal can be a
bit un-predictable in terms of how it stretches and flattens. Using a
standard minimum flange length should get you close enough for most
applications. Remembering the Air Bend Force Chart the minimum flange length for an acute tool is:
No comments:
Post a Comment